Bloglovin

Follow on Bloglovin

Friday, February 25, 2011

Drawings to Cuddle

Some fun illustrations I did this week that just might end up as large comfy pillows available on etsy... stay tuned!!!


Friday, February 18, 2011

Embroidered Medal Brooch + Party!!

After doing my last embroidery and enjoying it very much, I got together with a few of my girls and had a Bitchin' Stitch party. Some beginners, some more experienced, but all very talented and we had a blast.

(From Left to Right)

Here's what I was working on:

Beginning sketch and completed embroidered ribbon detail.

Work in progress, shape details complete.

Filled in interior, front and back view.

Sewed on the back, then turned it right side out.

Hand stitched outside edge. Finished front and back view.

So sharp.

Saturday, February 12, 2011

Winter Embroidered Brooch

Lately I have been getting into brooches. They are so fun and are easy to add to any outfit. They are also very versitile. I have turned into a bit of a collector lately and I hung up a thick piece of felt in my room with giant push-pins so I could display them all. Here they are!


Having some fun embroidered ones I thought I'd made some of my own. I was inspired by the winter weather and all the cute illustrations by Memi the Rainbow. With winter break also came a bunch of free time and I decided it was time! I embroidered this little guy and filled him with a little poly-fil so that he is a bit squishy. Horray!

Tuesday, February 8, 2011

Pez Luggage Tag

When I saw this awesome luggage tag on flight001 I really wanted to get it. But the thing about luggage tags is that they always get ripped, dirty, stolen, or lost. So I decided instead of buying one for $12 I would make it!

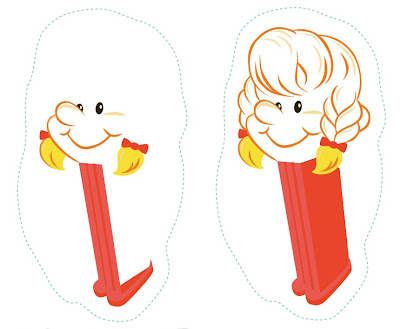
I started out drawing the design in Illustrator:


Then I cut a 8.5" x 11" piece of tyvek because you know if I made it out of paper it would last about a second and this way I can just print the image with my printer instead of paying to print it on fabric.

I made an outline around the image where I would cut it, copied the outline, made the other side with my contact info, made an extra shape, and printed it with my regular inkjet.


I used the extra shape as a pattern to cut out a piece of vinyl to put in between the front and back piece to make it a bit more substantial.


I sandwiched the vinyl in between the other two pieces and sewed it around the edge:


I cut a rectangular hole in the top of the tag inside the sewing line. Then I cut a short piece of elastic which I sewed into a loop with a french seam and threaded it into the hole, voila!!

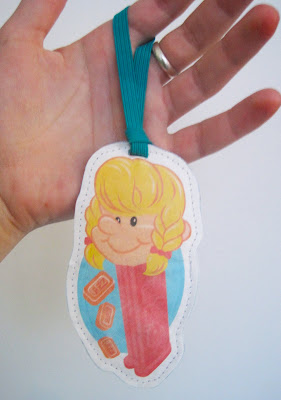
Now when this one gets dirty, lost, stolen, or ripped (it won't rip though because it's tyvek!!) I can just make another one, it's so quick!!
You can use any drawing, try it out!