Bloglovin

Follow on Bloglovin

Tuesday, March 20, 2012

Plush Hardcover Sketchbook Tutorial

Whenever I come across fun design books they have awesome covers  I'm not just talking about classically bound hard cover books with cool images printed on the cover.  I mean when there's a unique tactile experience happening and the book is hardcover yet also plushy and soft.  Here's a tutorial for this exact kind of book.  The best part is that you can do the cover however you want in your sewn style.  The last time I made a sketchbook I was in college in Ohio and my teacher spilled her hot chocolate all over it.  Let's start again shall we?


First you will need paper and lots of it.  I made a little pre book illustration to get the book started.  The size and thickness of the sketchbook is all up to you.  Keep in mind that however big the pieces of paper you cut are, the book size will be those pages folded in half (kind of obvious, right?)  I made mine with four sheets in each pile folded in half.  This folded stack is called a signature.  I made my sketchbook with five signatures.  Any kind of paper will work.

Poke holes through the fold of all of the signatures one hole at the top and bottom about 1/4" from the edge and sets of 2 holes along the fold depending on how large your paper is.  


Using a needle and thread sew in and out through all of the holes of one signature.  At the end of one, start sewing through the next one.  When the thread is on the outside binding catch the stitch from the last signature making an x.


When you're done is should look something like this


Now it's time for the hard cover.  I used illustration board but any thick board will work.  Cut the front and back the same size as your book and a spine the width of your paper spine.


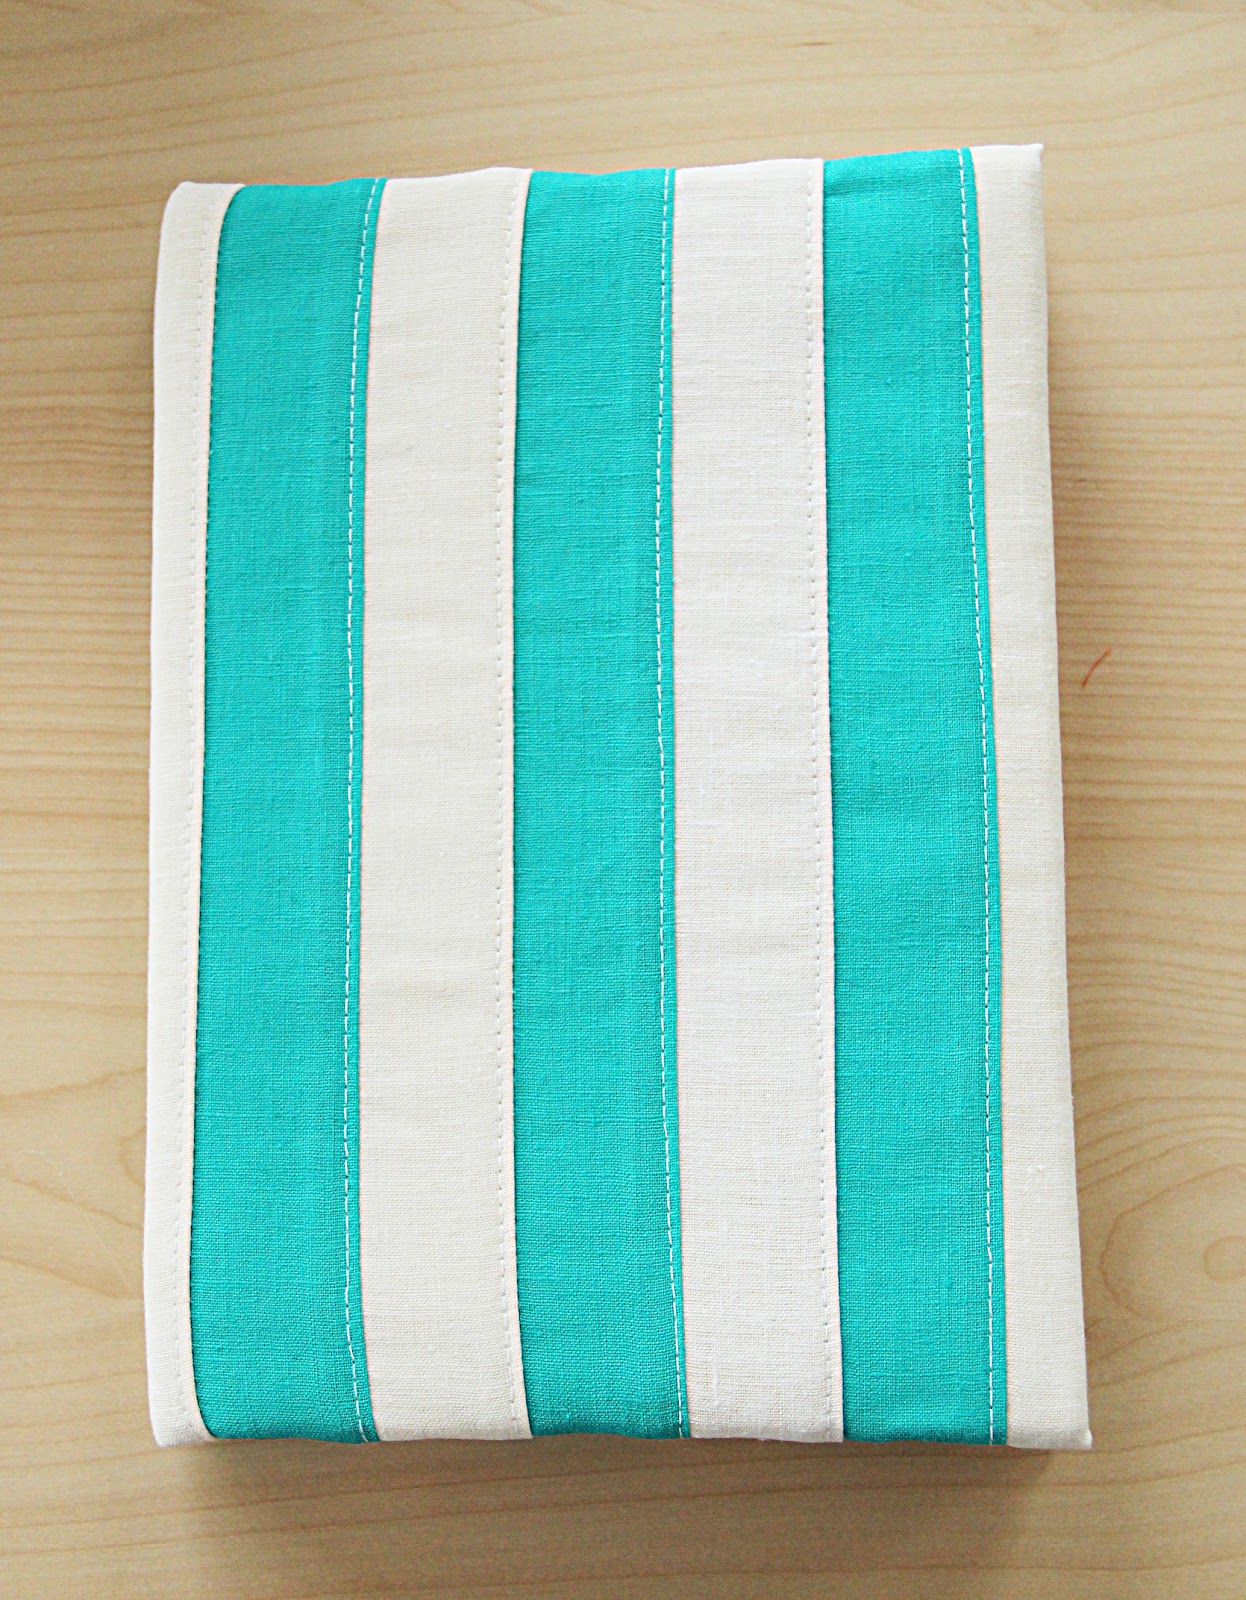
Now the fun part!!  This will be the outside of your book.  I sewed strips of turquoise and cream linen together.  Use a single piece of fabric, embroider, sew patches on it, do whatever you want!  Make sure it's big enough to fold around the edges of your book.


Lay out your book cover and then put down a layer or two of batting the same size as your cut board to make the cover more plushy.  Then on top of that put the board that you cut out with the spine about 1/8" from the front and back cover.


Fold the edges of your fabric over the batting and board.  Use craft glue to secure the fabric all the way around.  Now it's getting serious, cut a piece of fabric that's the length of your book and about 3" wide.  Glue just the binding of the paper to the middle of the fabric.  Let it dry for a while.


Glue the fabric piece to the middle of your book cover.


Cut your end paper to finish the front and back of the book.  I used fabric instead but if you use fabric make sure to use something that won't fray.  It gets a little tricky here, glue your end papers to both ends of the book and let dry.


Close and admire!!


Plushy book detail


Teeny just adores it.

Friday, March 9, 2012

Sewn Felt Slippers

I came across this Martha Stewart how-to for some sewn felt slippers.  I've been on serious lookout for new slippers lately which has been surprisingly difficult.  All the lady slippers available for purchase look like either your grandma wears them in her bathroom or your little sister wears them as her feet are dangling from her chair while she eats breakfast at the kitchen table.  Most of them are thong slippers or open toe which makes no sense to me since the primary reason I wear slippers is to keep my ice toes thawed.  They are also usually made out of fabric that should be used for an infant's teddy bear.  For these reasons I have to resort to mens slippers which are fantastic foot huggers perfect for gliding from sewing machine to sewing machine all day but come in hideous colors (apparently any color besides black, navy, and taupe falls off the end of the Earth when it comes to mens footwear).

The original tutorial calls for an 18 x 18 3mm piece of wool which gives you a pair of monochrome slippers.  I'm more of a two tone kind of gal and don't like to follow directions verbatim so I modified the pattern, what else is new.  You can see a more informative video here since the instructions on the link above aren't super clear.


Above is the original pattern which with the fold in the pattern gives you the top and bottom sides.


I cut it in half and added a tiny 1/8" hand sewing seam allowance and widened the opening for the foot.


I cut the top half out of gold felt and the bottom half out of grey felt.  If you decide on taking up the 2 tone slipper challenge remember to put a darker color on the bottom since it will get dirty.


Then the sewing begins.  The drawback to doing a 2 tone slipper is that you have to sew the entire way around the slipper instead of just halfway (because it's on the fold) but at the end you have a way cooler slipper.  You decide.


Now that my finger is a bruised pincushion from hand sewing around the edge with embroidery thread (I really need to learn how to use a thimble) it's time to move onto the next step.


I matched up and sewed the back edges of the slipper.  After that I tucked in and sewed the heel flap of the slipper and then turned the whole thing inside out.


Then it looked something like this (starting to look like a slipper now).  I rounded the edge of the flat with scissors and stitched it to the heel.


Heel stitching in progress


To secure the flaps I did a dotted line stitch all the way around the cuff instead of sewing the bottom edge to the shoe.  It looks more awesome since I used such a think contrasting thread and also by doing it this way I'm not covering up my other lovely stitching.


Ta-da!!  It's finished! Side view: isn't it way better with 2 colors?


 Top view


Foot view: please ignore the terrible sock mark.  I never claimed to be a foot model.
Now all I have to do is make the other shoe...

Saturday, March 3, 2012

Apartment Handywork

After weeks of spray painting and glass cleaning, I finally got all of my posters framed and arranged on the wall in addition to all of the other things I was putting off hanging up.  About time, since I moved into this apartment last July.  A few of them I got professionally framed because I couldn't find the right size frame and the rest I bought cheap frames and spray painted them.  Bet you can't guess which ones are which.


All my treasures!
Clockwise from top left


The opposite wall: skate decks and the sun!


Shelves above my desk: mason jars with beads and buttons along with other knick knacks.


I got this awesome white solid wood wall shelf but it was a bit bland for my taste so I spiced it up a bit.


I spray painted it bright red and covered it with a protective UV coating.  Then I screwed on some fun little blue and yellow hooks because there seemed to be a lot of empty space there to not have any hooks.


Here it is hanging on my wall looking much less lonely with all of those things on it.  The turtle and alpaca I got in Peru.  I made the tiny crown and birthday hat.  The kitty I got here.


Bedroom wall with red shelf, Teeny cat (she loves the treasure chest), and Little Friends poster


Cubby and hooks with awesome Tad Carpenter Poster


More frames by my Brooches


Now that all the frames are on the wall instead of clotting up my space it's back to work!